
Studio 4: Flag Day
Studio activities should not be started before class! Come to the session and work on the activity with other students!
Studio Setup and Procedure
You know the drill by now! 2–3 students per group. Here’s the Github link.
Overview
Understanding how to draw things using
StdDrawPractice reading data in from a file
Experiencing design at the intersection of human beings and computers
Design is largely all about communicating your intentions in a way that other people can understand. Human-centered design, a critical concept in computing, means you’re always thinking about the people who will be using or seeing your work. In this case it’s also important to think about technical limitations and restraints on what you can easily draw.
Reading shape data from a file
Your first task is to use Scanner and StdDraw to draw shapes based on data from a file. Do not spend more than 40 minutes on this part before moving on to designing and drawing your own flag!
Open up
InterpretDrawingFile.Java.When the code is run, it will prompt you to select a.txtfile from a pop-up window.In order to get an idea of what is in these
.txtfiles, open up theresourcesfolder and take a look.
These files are specifications for given shapes, and contain the following information in this exact order:
String shapeType, int redComponent, int greenComponent, int blueComponent, boolean isFilled, double parameterOne, double parameterTwo, double parameterThree ...
The double values at the end depend on the shape type (more on that below).
You will be creating code in the method that will read the data from the file you select in the dropdown and will draw the given shape.
To read from the file, you can use
Scannermethods likenext()andnextInt(). Theinvariable is already set up for you to take from the file instead of prompting for user input.Begin by just trying to create the rectangle. The final four parameters given in the file are
double x, double y, double halfWidth, and double halfHeight.Once you have read in the rectangle data, use
StdDrawto draw the shape as specified in the file.
Once you are able to do this, test your code by editing the rectangle’s .txt file or creating a new .txt file!
If you have time, generalize your code to work for ellipses and then triangles. Ellipses have the same final four parameters as rectangles while triangles are represented with
double x1, double y1, double x2, double y2, double x3, double y3.If you finish triangles and have time, discuss how you would need to change your code and the file format to work for any polygon.
Individual exercise, create your ideal country
Work individually on all of the following:
Take out paper and a pencil (or something to draw with)
Think about a couple words or phrases you would use to describe your ideal country. These should be concepts you’d want to communicate using a national flag. A couple questions to ask yourself are:
What are the founding principles of your country?
What does your country care about?
What major exports do you envision for your country?
What’s the landscape of your country?
What kind of food does your country eat?
Write down some words or phrases that summarize your thoughts. Express at least three distinct concepts in a few words or phrases.
Individual exercise, create your country’s flag
Continue to work
individually. Sketch out a design for a flag that captures the spirit of the significant words/phrases for your country. Keep in mind that you are creating something for the world to see.
You may want to review the StdDraw API to get a sense of it’s capabilities (and limitations).
Consult with a TA for feedback about drawing your design with
StdDraw.Come back together with your studio group. Take turns showing off your flags. Have other members of your group try to guess your values based on your flag design. After hearing the guesses from your teammates let them know about the values that influenced your design.
Create your group’s flag
Now you’re going to create your group flag (drawing on paper) by taking your favorite features of each flag and designing a singular flag to represent the combination of the individual flags. Make sure a component of each flag is captured in the unified flag. Once again, keep in mind that you need to be communicating your ideas in a way that others can understand.
Draw your flag
Now that you have perfected your flag using the feedback provided it’s time to draw it using StdDraw!
Open the
Flagclass instudio4packageAdd code that creates your group’s flag. Some things to note:
Most of the drawing methods use the coordinates for the center of an object
Often methods need additional detail about how to draw outward from the center, like a circle’s radius or or a half-width and half-height for rectangles.
Sedgewick library provides several pre-defined colors. If you start to type something like:
StdDraw. then VS Code will fill in possibilities after the . which will include the colors at the top of that list.
Frame your flag by surrounding it by a black rectangle of substantial thickness (an unfilled rectangle).
When you’re done share your work! Show your flag to your neighbors/TAs.
Norway, Mother of all Flags
There will almost certainly not be time for this during studio (improve your flag design first!), but it is here for those interested. In NorwayMotherOfAllFlags.java we will be using Norway’s flag to create upto six other flags found within it.
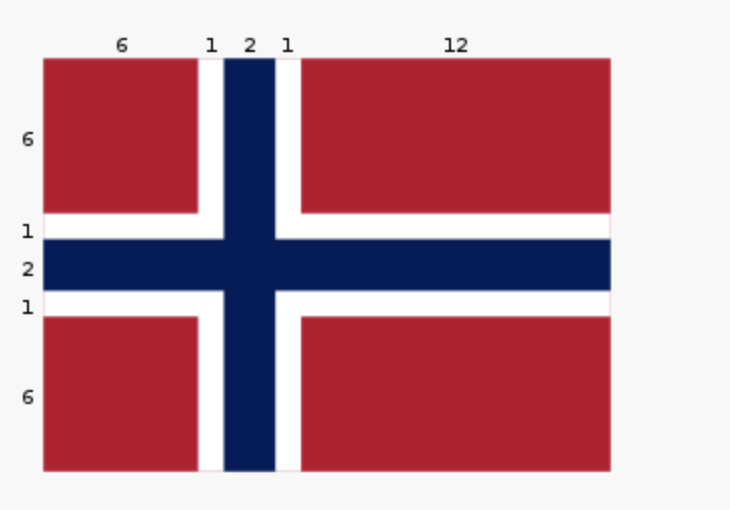
Whlie this task is seemingly just for fun, there is an important lesson to be found. Somtimes, when coding and otherwise, a small change to the problem setup can lead to a much simpler solution. Like when converting an integral to polar coordinates in math, the way the problem is framed can make a huge difference in how clean the work is and how much time it takes. For example, in implementing the norway() method, we could have calculated the correct rectangles in StdDraw’s default (0..1, 0..1) space. Why do that when the values are right there in the image in (0..22, 0..16)?
private static void mother() {
   StdDraw.clear();
   StdDraw.setPenColor(255, 0, 0);
   StdDraw.filledRectangle(3, 3, 3, 3);
   StdDraw.filledRectangle(3, 13, 3, 3);
   StdDraw.filledRectangle(16, 3, 6, 3);
   StdDraw.filledRectangle(16, 13, 6, 3);
   StdDraw.setPenColor(0, 0, 127);
   StdDraw.filledRectangle(11, 8, 11, 1);
   StdDraw.filledRectangle(8, 8, 1, 8);
}

public static void norway() {
   StdDraw.setXscale(0, 22);
   StdDraw.setYscale(0, 16);c
   mother();
}
Below are the steps for this task:
Some code has been written for you in
main()and under the methodsmother()andnorway(). Run the program to see what it looks like to begin with.Investigate
StdDraw.setXscale(min, max)andStdDraw.setYscale(min, max).Six other methods (labeled with
// TODO) remain to be completed. Can you figure out how to create these flags? Investigat thenorway()method as an example to see how your code might look.
France

Indonesia (note: the bottom half of this flag is white)

Netherlands

Poland (note: the top half of this flag is white)

Thailand

Finland

Demo
Commit and Push your work. Be sure that any file you worked on is updated on GitHub. This way the other members of your team will be able to access the code that you worked on.
To get participation credit for your work talk to the TA you’ve been working with and complete the demo/review process. Be prepared to show them the work that you have done and answer their questions about it!